04.23.2021
No-Knead Bread is a Foolproof Recipe
Easy no-knead bread with flour, water, salt, and yeast. Tips for proofing, flavoring, Dutch oven baking, and getting a crisp crust.
- Simple ingredients and a very wet dough create a rustic loaf with minimal effort.
- Long, slow room-temperature rise develops flavor and structure without kneading.
- Bake in a well-preheated Dutch oven at 450F with the lid on then off for a crunchy crust.

In 2006, New York City baker, Jim Lahey, shared a simple bread recipe with New York Times food writer, Mark Bittman. 15 years later, Lahey’s no-knead bread recipe has become a phenomenon for cooks everywhere, and a stepping stone into baking seriously good bread at home.
You will be amazed at what you can create with a little flour, water, salt, and dry yeast. Plus, the flavor options are endless. Simply whisk a teaspoon of your favorite dried herbs, spices, and seasonings right into the flour for a gourmet twist on a classic loaf of bread. Be sure to check our list at the bottom of this article for a few of our favorite bread flavorings.
The recipe and steps shown below are where we found the most success in our test kitchen. For more no-knead context, we recommend checking out the thousands of no-knead bread videos on YouTube. Mark Bittman and Jim Lahey’s original no-knead bread video and Kenji López-Alt’s POV cooking video are excellent resources. From there, you can take a few notes and make your own spin on this popular recipe.
View this everything bagel no-knead bread recipe, for a more printer-friendly version.
If you have any questions about spices or making gourmet bread at home, email us at spices@thespicehouse.com, or leave us a comment below.
Step One: Ingredients and Equipment

Ingredients:
3 cups all purpose flour
2 teaspoons kosher salt (Diamond Crystal Kosher Salt)
1/2 teaspoon dry active yeast (scant 1/2 teaspoon)
1 teaspoon of your favorite dried herbs, spices, or seasonings
1 ½ cups room temperature water (70F)
For this demonstration, we used a teaspoon of our Everything Bagel Seasoning. Check our list at the bottom for more of our favorites spices for making homemade bread. (Note, we lowered the salt to 1 1/2 teaspoons as the bagel seasoning has salt in it too.)
Equipment:
A cast-iron Dutch oven or heavy pot with a lid
Large mixing bowl
Plastic wrap
Parchment paper
Clean kitchen towel
Whisk
Rubber spatula or wooden spoon
Step Two: Forming the Dough

Combine the dry ingredients in a mixing bowl. Whisk to evenly distribute the yeast, salt, and optional spices throughout the flour.
Form a well in the middle of the flour and add water. Using a clean hand or spatula, combine ingredients until they are formed together. Remember not to knead, as you just want a rough ball of dough.
Step Three: Proofing the Dough

Cover the mixing bowl tightly with plastic wrap. We like to use plastic wrap and a dinner plate as a lid for the bowl to ensure a better seal.
Leave the covered bowl out at room temperature for 8-12 hours. (The yeast is happiest around 70F.) After 8-12 hours, the dough will have risen sufficiently for baking. You can also let it rise for a little longer. We let our dough rise for roughly 22 hours and had excellent results.
Step Four: Shaping the Dough

Prepare a floured surface. A large cutting board or sanitized kitchen counter works perfectly. Tear a piece of parchment paper and keep it next to your workspace.
Gently flour the surface of the dough in the mixing bowl. Using your fingers, carefully and quickly pull the dough away from the walls of the bowl to free it loose onto your workspace. (You don’t want to handle the dough too much as it will be sticky.) With floured hands, gently fold the dough together at four opposing points.

Pinch your folds together and then flip the dough over so it is sitting on the sealed seam you just created.

Gently spin and form the dough into a round or oval shape depending on the style of your dutch oven. Carefully lift the formed dough and place it onto your piece of parchment paper.

Step Five: Final Rise
Coat the top of the dough with a generous dusting of flour so it does not dry out or stick to the towel. Cover the dough with the kitchen towel. (You can even rub some flour into the clean towel to prevent sticking.) Make sure the towel is loose, but flush with the dough to prevent it from drying out as it rises one last time.

While the dough rises, place your Dutch oven on the middle-to-lower rack of your oven, and preheat to 450F. The dough will need another hour to rise and the Dutch oven will need at least an hour to properly preheat inside and out.
Step Six: Decorating and Baking Your Bread
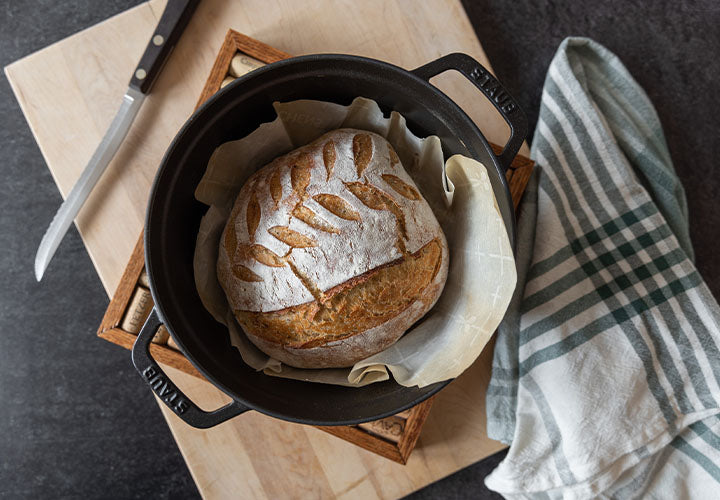
Here comes the fun part! Once an hour has passed, use a clean razor blade or very sharp knife to create a few slashes on the surface of the dough. These slashes allow the bread to expand evenly while baking. They are also a chance to let your artistic talents shine. One slash down the middle will suffice, but where is the fun in that?

While wearing oven mitts, carefully remove the Dutch oven from the preheated oven. Place the hot Dutch oven on a stovetop burner or trivet. Remove the lid and place it on another heat-tolerant area. Gently lift the parchment paper with the dough and place it into the Dutch oven. Return the hot lid on top and place it back in the oven.
Bake bread with the lid on for 20 minutes. Remove the lid and bake the bread for another 15-20 minutes. (Removing the lid allows the hot air to form that beautiful, rustic crust.) The bread will be thoroughly cooked when the center of the loaf has an internal temperature of 210F.
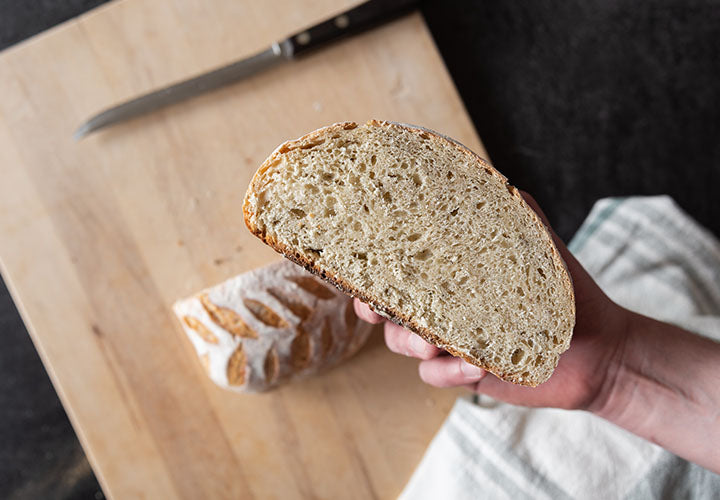
Step Seven: Cooling and Resting the Dough

Let the dough cool and rest for roughly an hour on an elevated cooling rack so air can flow around the entire loaf. This step is important so you can achieve that perfectly crunchy crust, and deliciously springy center. Once the dough has cooled to about 90 degrees, it will be perfect to eat.
Top 7 Spices for Baking Bread
The best part about this recipe is you can add your favorite herbs, spices, and seasonings right into the flour before forming the dough. We compiled a few of our favorite flavors to help inspire your next baking adventure.
Everything Bagel Seasoning

Deep in Queens, bagel baker David Gussin once used the leftover seasonings from the baking day altogether, and the everything bagel was born. Onion, garlic, poppy seeds, sesame seeds, and sea salt come together in perfect harmony to create the flavor of, well, everything. This is our favorite blend for flavoring homemade bread dough.
Herbes de Provence

The scent of Provence in a bottle, these classic Mediterranean herbs, dried at their peak, add summery redolence to rabbit, poultry, and ratatouille. We love working it into our no-knead bread for a touch of aromatic sophistication. Serve a warm slice of your herb-infused bread with a touch of butter and a pinch of French sea salt.
Tomato Powder

No Italian cook would admit to using anything but homegrown tomatoes, but sometimes we all rely on tomatoes in other forms. Reconstituted with water, this powder makes a paste for pizzas and pasta sauces. Add a teaspoon of dry tomato powder and dried basil to your no-knead bread to recreate the flavor of those amazing tomato-basil bagels.
Oktoberfest Bavarian Rub

Our Oktoberfest Bavarian Rub blend spruces up cold-weather preparations like pickles, beets, and soups. Rubbed on poultry, it adds a comforting, rustic flavor. Add a teaspoon of this blend to your no-knead bread recipe for a hearty flavor with aromatic notes of mustard seed, rosemary, garlic, thyme, sage, and bay leaf—perfect for a roast beef sandwich!
Italian Herb Blend

De re coquinaria was one of the earliest cookbooks written, in the first century AD. Its Roman authors noted that recipes should use a heavy blend of Italian spices. To our mind, they surely meant this blend, a balanced mix of oregano, thyme, basil, marjoram and rosemary, all the herbs integral to Italian dishes both ancient and new.
Caraway Seeds

Caraway seeds are the flavor everyone associates with rye bread. The Dutch love Caraway seeds in Leyden cheese. Danes love them in akvavit. The English love them in madeira cake, and Germans love them in sauerkraut. Obviously, there's something for everyone to love about this cousin of carrot and cumin.
Sesame Seeds

These gorgeous White Sesame Seeds add flavor and drama to dishes across the globe. Find it in the sesame sauces served at dim sum, in the sweet delicacy of jian dui, and in Western desserts like ice cream and financiers. Sesame seeds are no stranger to bread either. Stir these seeds right into the flour to add a deliciously nutty taste to your bread.
Article by Geoff Marshall, Staff Writer
Frequently Asked Questions
What is no-knead bread and why does it work?
No-knead bread uses a high-hydration dough and a long, slow fermentation to develop gluten and flavor. The long rise lets the dough strengthen on its own so you do not need to knead it.
How long should I let the dough rise?
Cover the bowl and leave it at room temperature for 8 to 12 hours as a baseline. You can go longer, even up to 22 hours, for more flavor. Aim for a visibly puffed, bubbly dough before shaping.
Can I use instant yeast or change the yeast amount?
Yes. The recipe calls for a scant 1/2 teaspoon of active dry yeast. You can use instant yeast in the same small amount. The exact measure is small because the dough ferments for many hours.
Do I need a Dutch oven to bake this bread?
A heavy lidded pot like a cast-iron Dutch oven gives the best oven spring and crust. If you do not have one, use a heavy pot with a lid or bake on a preheated baking stone and add steam with a hot pan of water or a few ice cubes on a lower rack.
How do I handle and shape the sticky dough without overworking it?
Flour your hands and workspace lightly. Pull the dough away from the bowl, fold four points toward the center, pinch the seam, flip the dough so the seam is down, then gently form a round or oval. Work quickly to avoid sticking and overhandling.
How do I know the bread is fully baked?
Bake at 450F with the lid on for 20 minutes, then remove the lid and bake 15 to 20 more minutes until deep golden. The loaf is done when the center reaches about 210F or when it sounds hollow when tapped on the bottom. Cool before slicing.
What flavorings can I add to the dough?
Stir a teaspoon of dried herbs, spices, or seeds into the flour before adding water. Good options include everything bagel seasoning, Herbes de Provence, tomato powder with basil, Italian herbs, caraway seeds, sesame seeds, or a savory rub.
How should I store leftover bread and reheat it?
Let the loaf cool completely, then store in a paper bag or loosely wrapped at room temperature for up to two days. For longer storage, slice and freeze. Reheat in a 350F oven for 8 to 12 minutes or toast slices for best texture.
Hi Karen,
That is a good question. If you visit King Arthur Flour’s website, they have an excellent reference chart for baking at altitude.
I would love to make this bread and am wondering if there are any special instructions for making it at high altitude (about 5400 feet). Thanks for any suggestions you can give to me!
In the Everything But Bagel no knead bread, is the amount of salt used for Diamond salt or Morton’s? Please designate in your recipes
Thanks so much, looking forward baking this.
Hi Heather,
Correct, we placed the parchment paper into the Dutch oven with the dough. The paper makes moving the dough much easier.
Good day, can you please clarify that I am actually putting the parchment paper into the Dutch oven to cook? Thank you!
Can this be made GF?
Hi Beth,
We used a 4-quart cast-iron Dutch oven, made by Staub. It is roughly 9" wide.
What size Dutch oven for this recipe? (I don’t have one but am looking to purchase and am not sure on the size)
Hi Susan,
We don’t currently have a gluten-free version of this recipe.
After a brief review of other GF bread recipes, it looks like you could could follow our steps, but substitute regular flour for GF flour. (You may also have to add a teaspoon tapioca flour.)
Please let us know if you try a GF version of this recipe and how it turns out!
Do you have a gluten free option for this no-kneads recipe? Thanks.